 v
0.2.6v
0.2.6
v
0.2.6v
0.2.6Open a model...
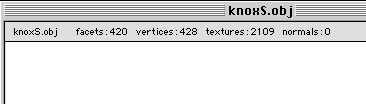
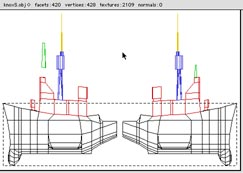
For this tutorial, I selected the model knoxS.obj which was included with the Apple MRJ demo applet called 'wireframe'. The model has no texture map, so when it opens, the UVMapper window is empty. The window is now named 'knoxS.obj'.
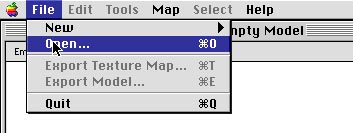
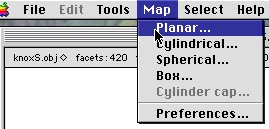
To add a texture map to the model, I select the type of mapping I would like from the Map menu. Hmmm.. think I'll go for planar.
I fill in the Planar Mapping Dialog. Note that the Scaling/Map Size feature of Steve Coxs UVMapper is not available presently. The 'Map Size' text field is not enabled, shown by the dotted outline. The size of the texture map produced by UVMapper Mac can be set in the Preferences Dialog. Try out some really big sizes if you have plenty of RAM and HD space, and need lots of detail.
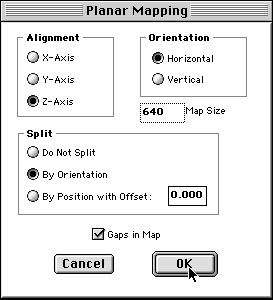
I decided to split my map down the centre of the ship, to show each side separately. I wanted some gaps between the 2 sides. Try other settings and see what they do. You can go back again and again, until you find a combination of settings which suit you best. The model does not need to be reloaded.

Above is my map. The model has several groups defined in it. My preferences have groups shown in different colours, which you can see in the map.
When I drag with the mouse around a small group of vertices in the map, that area becomes selected. Any vertices inside the area extend the selected area outwards so all faces to which they belong are selected. Try it.

I selected the green area by dragging around the top two corners of that shape.The selected area is indicated by the marching ants outline. Note the area surrounded by the marching ants is the smallest rectangle which contains the whole selection.
Note: If I select part of a facet with an irregular shape, the rectangle may cover some other parts of the map which are not selected. Not everything inside the rectangle is necessarily part of the current selection.
Try selecting a small area of a map and press the up arrow on the keyboard a couple of times. The area will be nudged upwards. The down arrow key will bring it back. Click carefully within the rectangle, and drag with the mouse. A small square will follow. When you let go of the mouse button, the selected area of the map will be moved to the last position to which you dragged. The facets are still selected. So you can move them further. Or scale them up or down. Or remap them independent of the rest of the model e.g. cylindrically, box mapping etc.
![]() This is how it looks
after I drag the green area upwards and let go. Then I hit the '*' key,
and the selection is scaled up (multiplied). The '+' key would have incremented
the size of the selection slightly. See below for a complete description
of the keyboard commands available for manipulating selected facets in
the map window.
This is how it looks
after I drag the green area upwards and let go. Then I hit the '*' key,
and the selection is scaled up (multiplied). The '+' key would have incremented
the size of the selection slightly. See below for a complete description
of the keyboard commands available for manipulating selected facets in
the map window.
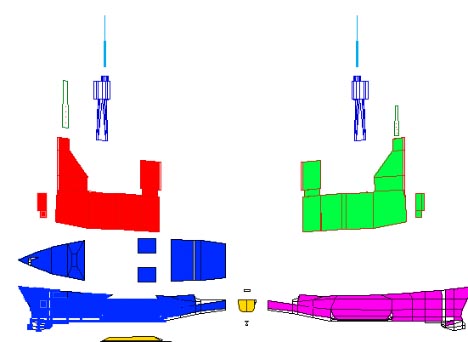
 After scaling, the
green area now looks like this. So I might save my work, so I can carefully
colour in the map of the knoxS.obj model, and render it in Poser.
After scaling, the
green area now looks like this. So I might save my work, so I can carefully
colour in the map of the knoxS.obj model, and render it in Poser.
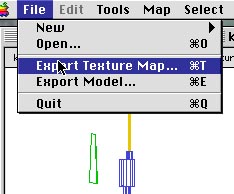
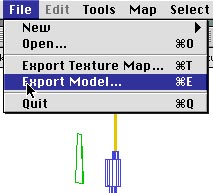
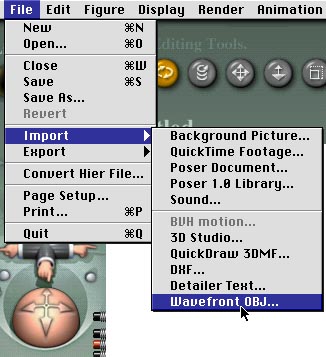
First I will export the texture map template. (The order is not important, I could have exported the model first.)
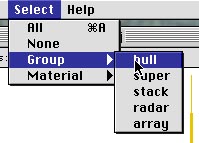
After saving, we can play some more with the model, and save another version of the map and its template if we like. knoxS.obj has some groups defined. I select the 'hull' group from the Select menu.
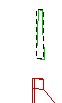
The selection rectangle selects the ships hull. Note the red superstructure is not part of the selection.
I think I will use Box mapping on the hull. The newly mapped hull (6 sides of a box, because I used the 'split' option) fills the selection rectangle. Some parts overlap the red superstructure. Oops, I will clean that up before saving. Perhaps I will decrement the selection size. Or move the superstructure upwards/scale it smaller. There are lots of options. Play around and try them out.

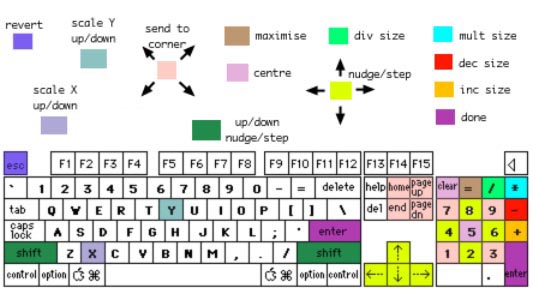
Key |
Action |
| return , enter | done |
| esc | deselect without changes |
| '*' | multiply size |
| '/' | divide size |
| up arrow, numpad 8 | nudge upwards |
| shift / up arrow, numpad 8 | step upwards |
| down arrow, numpad 2 | nudge downwards |
| shift / down arrow, numpad 2 | step downwards |
| left arrow, numpad 4 | nudge left |
| shift / left arrow, numpad 4 | step left |
| right arrow, numpad 6 | nudge right |
| shift / right arrow, numpad 6 | step right |
| numpad '+' | increment size |
| numpad '-' | decrement size |
| 'home', numpad 7 | to top left corner |
| 'page up', numpad 9 | to top right corner |
| 'end', numpad 1 | to bottom left corner |
| 'page down', numpad 3 | move to bottom right corner |
| 'clear', numpad 5 | to centre |
| 'x' | increase x scale |
| shift / 'x' | decrease x scale |
| 'y' | increase y scale |
| shift / 'y' | decrease y scale |
| '=' | maximise scale |
I quickly put a wild colour scheme onto the knox with a paint bucket tool.
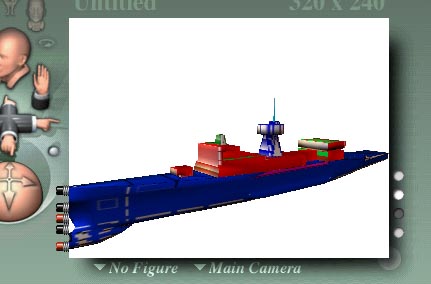
I import the model into Poser.
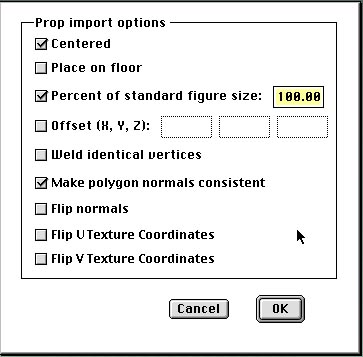
The default settings (above) seem to work fine.
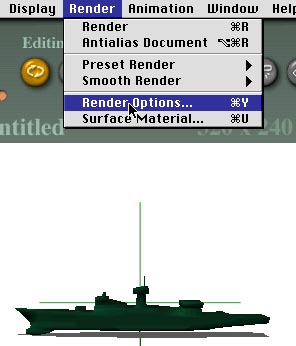
Now use 'Render Options' to make sure the texture map will be applied to the model.
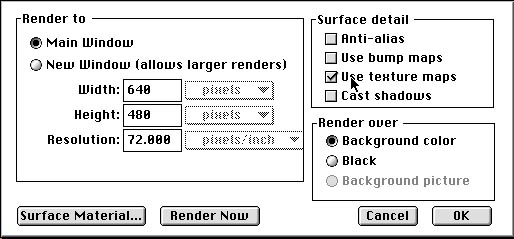
Make sure texture maps are checked. Then go to 'Surface Material...'
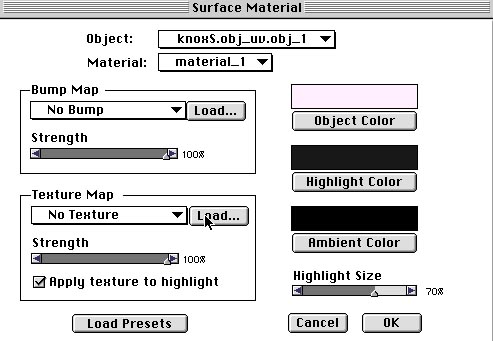
I set the object colour so it will not obscure the map colours. Imported models often start off with dark/strong colours which interact with the colours in the map I created. I now load the texture map file which UVMapper created, and over which I painted.
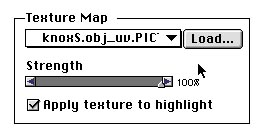 I make sure the
map is selected in the menu.
I make sure the
map is selected in the menu.
And render...
maybe the other side looks better...
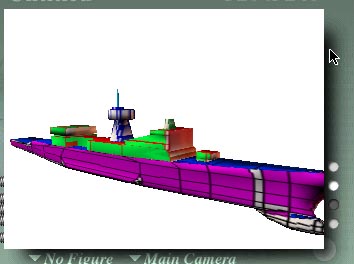
... oh well, back to the old drawing board.