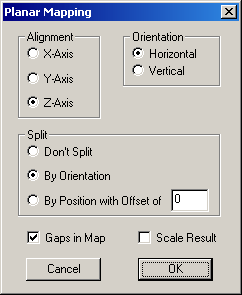
Planar Mapping
Applies
planar mapping the the current selection, or to the entire model if there is no selection active.

Summary
Alignment
Orientation
Split
Gaps in Map
Scale Result
Description
Alignment
Determines the direction of the planar mapping. The mapping
will be performed from the positive side of the selected axis to the negative
side. The Z axis is the default setting because it is the default for
the 3D preview as well.
Orientation
When a split option other than "Don't Split" is selected, this
option will allow you to orient the two portions of the planar map within the
UV space. To place them side by side, select horizontal. The
vertical setting will place on side above the other. This option has no
effect when "Don't Split" is selected as the Split option (see
below.)
Split
This option can divide the mapped facets into two sections.
Selecting "By Orientation" will cause the facets to be divided based on which
way they are facing. Those facing mostly toward the positive axis
(selected with the Alignment option above) will be in one section, with all
the rest will be in the other. Selecting "By Position" will divide the
facets based on where they are located, with those having a positive value
along the selected axis in one section, and all the rest in the other.
You can also specify an offset to adjust where the division occur.
Selecting "Don't Split" will result in only one mapped
section.
Gaps in Map
Selecting this option will cause a border of blank space to be
placed between the sections of the mapping, as well as around the entire
mapping area. It's a good idea to leave this option checked since each
3D rendering program can interpret UV coordinates slightly differently and
it's a good idea to paint over the edges of a map by a few pixels.
This isn't possible without gaps in the map.
Scale
ResultThis option will cause the resulting map to
be scaled based on the "Pixels Per Unit" setting under Preferences.
