Interactive Mapping
UVMapper Professional offers each mapping mode in a fully interactive environment.
The following entry describes the use of the interactive mapping feature.

Summary
Getting started
Realtime
Enabled
Reset
Next
Mode
Project
Align Axis
Align Seam
Planar
Planar
Split
Box
Cylindrical
Cylindrical
Cap
Spherical
Polar
Controls
Description
Getting Started
First, be sure you have Select by
facet mode enabled. This is done by choosing Select |
Select Method | by facet from the main menu, or clicking on the
Select by facet button on the main toolbar (see below.)
If any other selection mode is active, the interactive mapper will be grayed
out and unavailable for use. Nest, select the portion of your model that you
would like to remap interactively. If no selection is active the entire model
will be remapped. Finally, there are three ways to turn on the interactive
mapping mode; select Map | Interactive | Enabled
from the main menu; press F2, the hotkey for that menu item; or click on
the Interactive Mapping
button on the main toolbar (see below.) This will
toggle the interactive mapping mode on. To exit interactive mapping,
simply repeat this selection to toggle it off.
Select by facet button
 Interactive Mapping button

Realtime
Normally you will not need to change this option. It
is offered for older systems that may lack the processing power to fully
utilize the interactive mapping mode. Because interactive mapping
is computationally demanding, some older systems or mapping of models with
extremely high facet counts may slow interactive mapping to an unacceptable
level. In this case, you can toggle this option off and you will be able
to adjust the interactive cage in the 3D view without remapping the model
every frame. When this option is disabled, remapping is achieved by
selecting the Project menu option below, or pressing the
corresponding hotkey
F5.
Enabled
This option toggles the interactive mapping mode on and off. When
active, there is a check mark next to the menu item, the interactive mapping
button on the menu bar is depressed, and the interactive mapping mode cage is
visible in the 3D view. The hotkey for this menu item is
F2.
Reset
Resets the interactive mapping cage orientation based
on the Align Axis and Align Seam options
(see below.) Hotkey F3.
Next Mode
Selects the next interactive mapping mode. The
modes are cycled trhough in the following order; Planar, Planar
Split, Box, Cylindrical, Cylindrical Cap, Spherical and Polar, just as they
appear on the menu.
Hotkey F4.
Project
This option is not usually needed unless the Realtime
option (see above) has been disabled. When the Realtime
option has been turned off, projection of the interactive cage must be
performed manually. To do this, select this item from the menu, or press
the corresponding hotkey F5.
Align
Axis
This option determines the major axis of the
interactive mapping control cage. You might want to change this based on
the orientation of your model or of the selection you are currently
mapping. The Reset option (see above) uses this setting
when resetting the control cage orientation. Options include X, -X, Y, -Y, Z,
-Z.
Align Seam
This option determines the alignment of the
seam on the interactive mapping control cage The
Reset option (see above) uses this setting when resetting the
control cage orientation. Options include X, -X, Y, -Y, Z, -Z.
Planar
Selects single sided planar mapping mode for
the interactive mapper. This mode is useful for two dimentional
objects that will only be seen from one side, such as decals, walls and
floors, etc. See also Planar
Mapping.
Planar Split
Selects two sided planar mapping mode for the
interactive mapper. This option uses the split 'By Orientation' option,
dividing facets into two groups based on the direction each facet is
facing. This mode is useful for mostly flat, two sided objects such as a
table top or a sign. See also Planar
Mapping.
Box
Selects box mapping mode for the interactive
mapper. This mode is useful for mapping six sided objects such as boxes,
cubes and dice. The facets are divided into six groups based on the
direction each facet is facing. See also Box
Mapping.
Cylindrical
Selects cylindrical mapping mode for the interactive
mapper. This mode is useful for mapping cylindrical objects such as
pipes. If you need the top and bottom of the object mapped separately,
use Cylindrical Cap mode (see below.)
See also Cylindrical
Mapping.
Cylindrical Cap
Selects cylindrical cap mapping mode for the interactive mapper.
This mode is useful for mapping cylindrical objects that include
a top and bottom such as barrels, batteries and soda cans. See
also Cylindrical
Mapping.
Spherical
Selects spherical mapping mode for the interactive
mapper. This mode is useful for mapping spherical objects such as planets,
basketballs, etc. See also Spherical
Mapping.
Polar
Selects polar mapping mode for the interactive
mapper. This mode is especially useful for mapping a human head
without any seams or
discontinuities. See also Polar
Mapping.
Controls
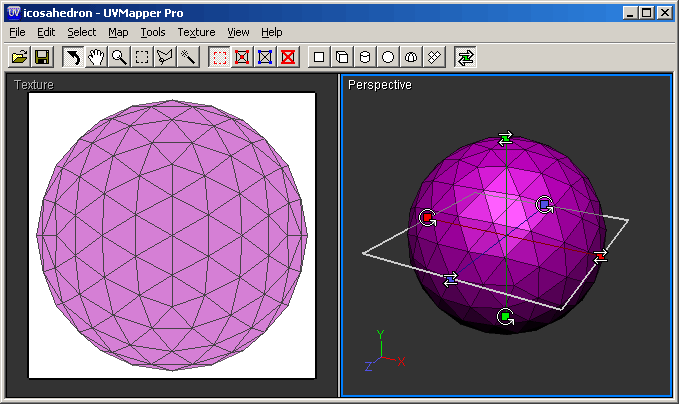
The interactive mapping cage is controlled directly by
left clicking the mouse on one of the translation or rotation controls in the
3D view (see below.) While holding the left mouse button down, drag the
mouse up or down on the screen. This will move/rotate the control cage
on the screen and update the texture map projection in realtime (unless the
Realtime option, discussed above, has been disabled.)
Moving the mouse up increases either the mapping offset [translation] or
rotation angle [rotation] depending on the selected tool. Similarly,
dragging the mouse down decreases the mapping offset or rotation angle.
Release the mouse when the adjustment, and resulting map, is to your
liking.
Color conventions for
the interactive mapping cage are as follows; the X-axis is red, the
Y-axis is green, and the Z-axis is blue. Default colors
for the control cage: white lines show the projection while yellow lines
indicate a seam. Note: you can change the colors assigned to the
control cage with the Preferences dialog box.
See also
Preferences.
 X-axis translation tool.
  Y-axis translation tool.
  Z-axis translation tool.
 X-axis rotation tool.
  Y-axis
rotation tool.
  Z-axis rotation
tool.
 Interactive Mapping button


 X-axis translation tool.
  Y-axis translation tool.
  Z-axis translation tool.
 X-axis rotation tool.
  Y-axis
rotation tool.
  Z-axis rotation
tool.