Map Menu
Summary
Last Projection
Planar
Box
Cylindrical
Spherical
Polar
LSCM
Interactive | Realtime
Interactive | Enabled
Interactive | Reset
Interactive | Next Mode
Interactive | Project
Interactive | Align Axis
Interactive | Align Seam
Interactive | Planar
Interactive | Planar Split
Interactive | Box
Interactive | Cylindrical
Interactive | Cylindrical Cap
Interactive | Spherical
Interactive | Polar
Rotate Model
Tile by | Group
Tile by | Material
Tile by | Region
Tile by | Island
Color | Natively
Color | by Group
Color | by Material
Color | by Region
Description
Last Projection
UVMapper Professional keeps track of the last mapping projection mode you used and will repeat it (with the same settings) when you select
this option. You can also use the hotkey Ctrl+Q.
Planar
When the interactive mapping mode is not selected, this option will bring up the Planar Mapping dialog box. If
there is a selection active, only the selected facets will be projected, i.e. have their texture coordinates changed. When the
interactive mapping mode is selected, choosing this option toggles the interactive mapping mode between one sided planar mapping and
two sided planar mapping. This will be reflected in how the interactive mapping cage is displayed, as well in the projected texture
map.
See also: Planar Mapping, Interactive
Mapping.
Box
When the interactive mapping mode is not selected, this option will bring up the Box Mapping dialog box. If there
is a selection active, only the selected facets will be projected, i.e. have their texture coordinates changed. When the interactive
mapping mode is selected, choosing this option selects box mapping for the interactive mapping mode. This will be reflected in how
the interactive mapping cage is displayed, as well in the projected texture map.
See also: Box Mapping, Interactive
Mapping.
Cylindrical
When the interactive mapping mode is not selected, this option will bring up the Cylindrical Mapping dialog box.
If there is a selection active, only the selected facets will be projected, i.e. have their texture coordinates changed. When the
interactive mapping mode is selected, choosing this option toggles the interactive mapping mode between cylindrical mapping mode
and cylindrical cap mapping mode. This will be reflected in how the interactive mapping cage is displayed, as well in the
projected texture map.
See also: Cylindrical Mapping, Interactive Mapping.
Spherical
When the interactive mapping mode is not selected, this option will bring up the Spherical Mapping dialog box. If
there is a selection active, only the selected facets will be projected, i.e. have their texture coordinates changed. When the
interactive mapping mode is selected, choosing this option selects spherical mapping for the interactive mapping mode. This will
be reflected in how the interactive mapping cage is displayed, as well in the projected texture map.
See also: Shperical Mapping, Interactive Mapping.
Polar
When the interactive mapping mode is not selected, this option will bring up the Polar Mapping dialog box.
If there is a selection active, only the selected facets will be projected, i.e. have their texture coordinates changed. When the
interactive mapping mode is selected, choosing this option selects polar mapping for the interactive mapping mode. This will be
reflected in how the interactive mapping cage is displayed, as well in the projected texture map.
See also: Polar Mapping, Interactive
Mapping.
LSCM
LSCM stands for Least Squares Conformal Mapping. This method minimizes angle deformations when mapping the 3D facets onto a 2D
space. It is the most efficient way to generate texture maps with the least amount of distortion possible. Unfortunately it is
computationally expensive and therefore is not available in the interactive mapping mode. You can easily control the results of the
mapping by selecting vertices to pin them while all unseleted vertices are free to be remapped.
Interactive
This item displays a submenu of options for controlling interactive mapping in UVMapper Professional. For a description of how to use
interactive mapping as well as a full description of each of these options, please see Interactive
Mapping.
Rotate Model
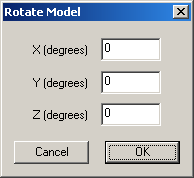
This feature allows you to rotate a copy of the model's geometry that is used by the projection routines (e.g. Planar
Mapping, Cylindrical Mapping, etc.) Enter the angles in degrees that you would like for the rotation around
each axis. The actual geometry of the model is not changed. You do have the option of saving the rotated version of the
geometry when exporting the model by selecting Export Using Rotation Settings in the OBJ Export
Options dialog box.
See also: File Menu.

Tile by
Use this command to rearrange the entire texture map so that each group, material, region, or island is placed in it's own section, or tile,
of the map. The four options, Group, Material, Region, and Island allow the map to be divided
accordingly. (Note: Islands are unconnected sections of the UV map.)
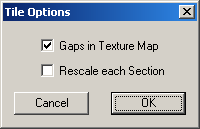
There are two options when you select the Tile by command:
Gaps in Texture Map - When this option has been checked, UVMapper Professional will leave a small amount of space
between each tile. If you would like each group, material, region, or island to use the full area of each tile, be sure this option is
unchecked.
Rescale each Selection - When this option is checked, each group, material, region or island will be scaled to fill the full
area of its tile (or slightly smaller if "Gaps in texture map" has been selected.) This option is especially useful when you have
several groups, material, regions, or islands that are quite small on the texture map. Rescaling them helps to make the best use of space on your
texture map.

Color | Natively
When this option is selected, the texture map template in the 2D preview will shade each material using the diffuse color from
the material settings for the model.
See also: Material Properties.
Color | by Group
When this option is selected, the texture map template in the 2D preview will be drawn to show each group with it's own color.
There are currently fourteen different colors. If there are more than fourteen groups the colors will be reused.
Color | by Material
When this option is selected, the texture map template in the 2D preview will be drawn to show each material with it's own
color. There are currently fourteen different colors. If there are more than fourteen materials the colors will be
reused.
Color | by Region
When this option is selected, the texture map template in the 2D preview will be drawn to show each region with it's own color.
There are currently fourteen different colors. If there are more than fourteen regions the colors will be reused.

